Configure data for Arria Answers
This first topic covers the further data configuration required for Arria Answers. It assumes that the initial data configuration — performed after you select your worksheet in the Arria for Tableau extension — has already been done.
You should start this tutorial on the Get started with... page of the extension, and all three features — NLG Apps, Arria Answers, and Custom Narratives — should be available. If these are grayed out, the initial data configuration is still required.
Tip
To arrive at the starting point for this tutorial, complete the short Getting Started tutorial for Arria for Tableau.
Click Arria Answers.

The first thing you will see is a list of dimensions. Some of these require further configuration for Arria Answers.
Click YEAR(Date) and ensure its Entity Type is set to
DateTime.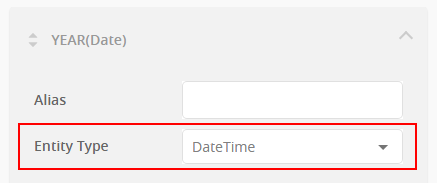
Note
You can give a dimension or measure an alternative name using its Alias field but this is not required in this tutorial.
Repeat Step 2 for QUARTER(Date), MONTH(Date), and DAY(Date).
No further action is required for the dimensions. You can change the priority order for dimensions by using drag and drop, but no change is required for this tutorial. See the reference documentation for more about prioritizing data fields.
Scroll down to the Measures section.
Click Cogs and change its Entity Type to
currency.Note
Setting the Entity Type to
currencyensures that any value calculated for the measure will be given as a currency value — e.g. ¥200K rather than 200,000. You select the currency unit in the next stage of the tutorial.Repeat Step 5 for Profit, Sales, and Target Sales.
The Units Sold measure requires no further configuration.
All measures and dimensions are now configured as required for Arria Answers.
